











Tips for Replacing Dust Removal Bags: Proper Operation to Avoid Equipment Damage
Feb 07,2026

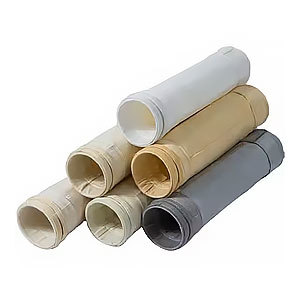
Dust bag is the core filtering component of bag filter, and its replacement frequency directly affects the dust removal efficiency and equipment service life. In actual operation and maintenance, many operators, due to non-standard replacement procedures and improper operating methods, not only cause premature damage to the dust bag, but also easily scratch the flower board, damage the cage bone, block the spray system, resulting in equipment failure and increased operation and maintenance costs.
1、 Preparation before replacement (the foundation for avoiding equipment damage)
Adequate preparation before replacement can effectively avoid problems such as misoperation and component collision during operation. It is the first step in protecting equipment and should focus on three points:
(1) Equipment shutdown and power outage, take safety precautions
The primary operation is to stop the operation of the bag filter, cut off the main power supply of the equipment and the power supply of the dust cleaning system, and hang the "Do not close, under maintenance" sign to prevent personnel injury or equipment damage caused by misoperation; At the same time, close the inlet and outlet air valves of the dust collector to prevent external airflow from entering the equipment, causing dust to fly and affecting operation. This can also prevent foreign objects from entering the air duct and blocking the equipment during the replacement process. Operators are required to wear dust masks, anti slip gloves, and protective goggles to avoid inhaling dust or scratching components.
(2) Clean the interior of the device and inspect the associated components
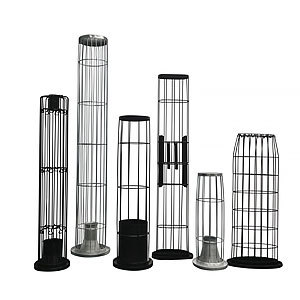
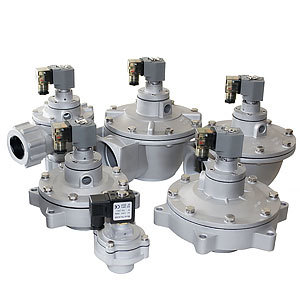
Open the dust collector maintenance door and allow the internal dust to settle naturally or gently blow with compressed air to clean the residual dust on the surface of the flower board and inside the ash hopper, avoiding dust from adhering to the flower board holes and spray nozzles, which may affect the installation and sealing of the new cloth bag; At the same time, inspect the related components such as the flower board, cage bone, spray pipe, pulse valve, etc. one by one: check whether the flower board is deformed or has burrs, whether the cage bone is corroded, deformed, or broken, whether the spray nozzle is blocked or misaligned, and promptly deal with any problems found before replacing the cloth bag.
(3) Prepare adapted tools and new cloth bags
Select new dust removal bags that are fully compatible with the equipment model and operating conditions; Prepare specialized tools, including wrenches, screwdrivers, rubber hammers, brushes, and compressed air spray guns. The tools should be cleaned in advance to avoid carrying debris into the equipment.
2、 Correct replacement steps (core operation, avoiding equipment and bag damage)
The replacement process should follow the order of "dismantling the old, inspecting, and then installing the new". Each step of the operation should be gentle and standardized, with a focus on avoiding problems such as scratching, squeezing, and misalignment. The specific steps are as follows:
(1) Dismantling of old cloth bags (to avoid damaging the flower board and cage bones)
1. Before dismantling the old cloth bag, first remove the cage bone from the bag: hold the upper edge of the cage bone, gently lift it upwards, avoid shaking or rotating left and right, prevent the tip of the cage bone from scratching the inner wall of the cloth bag, and avoid the cage bone from colliding with the flower board and spray pipe; If the cage bone is adhered to the cloth bag, do not forcefully pull it. Use low-pressure compressed air to gently blow upwards from the bottom of the cloth bag, loosen the adhered area, and then remove the cage bone.
2. After removing the cage bone, remove the old cloth bag: pinch the sealing port on the upper edge of the cloth bag with your hand, gently lift it upwards to separate the cloth bag from the flower plate hole, keep the cloth bag vertical during the process, do not tilt or twist, avoid scratching the burrs of the flower plate hole on the edge of the cloth bag, and do not pull the cloth bag hard to prevent dust from scattering into the equipment and blocking the pipeline after the cloth bag is damaged; If the old cloth bag is stuck in the flower board hole, you can use a brush to gently clean the dust at the connection between the flower board hole and the cloth bag, and then slowly remove it. It is forbidden to forcefully pry it with tools.
3. After dismantling the old cloth bags, place them one by one in designated containers and clean them in a timely manner to avoid dust scattering inside the equipment or at the operation site. At the same time, check whether there is residual dust or debris inside the flower board holes and clean them with a brush.
(2) Installation of new cloth bag (key steps to avoid poor sealing and equipment damage)
1. Before installation, check whether the new cloth bag is damaged, wrinkled, or stained. If there are any problems, replace it immediately to avoid affecting the filtration effect or premature damage after installation; At the same time, check if the cage bones are intact. If there is rust or deformation, replace the cage bones with new ones to prevent puncturing the new cloth bag.
2. Gently place the new cloth bag on the cage bone, ensuring that the bag is tightly attached to the cage bone without wrinkles or looseness. During the bagging process, keep it vertical and do not forcefully squeeze or pull the bag to avoid damaging the bag fibers and affecting its service life; If the bag is made of special materials such as film covering and anti-static, it is necessary to avoid sharp objects from touching the surface of the bag.
3. Place the new cloth bag with the cage bones in place vertically into the holes of the flower board, ensuring that the sealing mouth on the upper edge of the bag is completely attached to the surface of the flower board, without any deviation or gaps; Gently press the upper edge of the cloth bag with your hand to ensure a tight fit between the sealing seal and the flower board. If necessary, gently rotate the cloth bag to ensure proper fit. Do not press the flower board forcefully.
4. If the equipment is equipped with a bag press ring or buckle, the press ring and buckle should be installed in place, gently tightened with a wrench, and evenly applied during the tightening process to prevent the press ring from tilting or squeezing the bag.
5. After the installation of a single cloth bag is completed, gently pull the bottom of the bag to check if it is securely installed without looseness or deviation. At the same time, check if the cage bone is vertical to avoid excessive local stress on the bag caused by the cage bone being skewed, which may damage the bag in advance.
(3) Inspection and debugging after replacement (to ensure the normal operation of the equipment and avoid subsequent failures)
1. After replacing all new bags, check the installation of each bag one by one: check whether the bag is vertical, whether the seal is tight, whether the pressure ring is firm, whether the cage bone is intact and not skewed, whether there is residual dust or debris on the surface of the flower board, and whether the spray pipe and nozzle are smooth and not misplaced.
2. Close the equipment maintenance door, clean up the dust and debris on the operation site, remove the "Do Not Close" sign, connect the equipment power supply, and conduct a no-load test: start the dust collector, run the dust cleaning system, observe the spraying situation, check for uneven spraying, air leakage and other problems, listen to the sound of equipment operation, if there is any abnormal noise, immediately stop the machine for inspection, check for loose cloth bags, skewed cage bones and other problems, and deal with them in a timely manner.
3. After the no-load test is normal, perform load operation to monitor the abnormal pressure difference and dust emissions at the inlet and outlet of the equipment in real time. If there are any abnormalities, stop the machine immediately for troubleshooting to avoid damage caused by long-term abnormal operation of the equipment.
3、 Common erroneous operations and hazards (focus on avoiding pitfalls and protecting equipment)
Based on overseas on-site operation and maintenance experience, summarize four common types of erroneous operations, clarify their hazards, and help operators avoid risks:
Error 1: Directly replacing without shutting down the power supply can easily cause equipment to start incorrectly, resulting in personal injury. At the same time, the sudden start of the spraying system can blow dust into the operator's respiratory tract and may also damage the spraying tube and cage bone.
Error 2: Using sharp tools such as hammers and screwdrivers to pry open cloth bags and cage bones can easily scratch new cloth bags, damage flower boards and spray pipes, cause flower board deformation, clogged spray nozzles, and affect the normal operation of equipment.
Error 3: The new bag size does not match, the installation is loose, or the seal is not tight - dust will leak from the gaps, exacerbating internal wear and tear of the equipment, while causing a decrease in dust removal efficiency, an increase in the load on the dust cleaning system, and long-term operation will damage components such as pulse valves and fans.
Error 4: Running under load without testing after replacement - If there are problems such as loose cloth bags, skewed cage bones, and uneven spraying, it can cause abnormal equipment operation, exacerbate bag damage, equipment wear, and even lead to equipment failure.
4、 Precautions after replacement
1. The old cloth bags that have been replaced should be collected and properly disposed of to avoid dust pollution to the environment. At the same time, the replacement time, bag model, and quantity should be recorded, and an operation and maintenance ledger should be established to facilitate the subsequent tracking of bag service life and the development of replacement plans.
2. After replacing the new bag, the cleaning cycle can be adjusted appropriately during initial operation to avoid damage to the new bag due to frequent blowing. After the equipment runs stably, normal cleaning parameters can be restored.
3. In the subsequent operation and maintenance, regularly check the operating status of the new cloth bag, timely clean the dust from the flower board and spraying system, avoid dust accumulation that may cause cloth bag blockage and equipment damage, and extend the service life of the cloth bag and equipment.
The correct replacement of dust removal bags relies on "standardized procedures, gentle operation, and focused protection". From the pre replacement shutdown cleaning and component inspection, to the removal of old bags and installation of new bags during the replacement process, to the post replacement trial machine debugging, every step needs to avoid problems such as scratching, squeezing, misalignment, and poor sealing in order to effectively protect equipment components such as flower plates, cage bones, and spray systems, extend the service life of bag and equipment, and ensure the long-term stable operation of bag filters. Overseas operation and maintenance personnel only need to strictly follow the techniques described in this article, avoid common erroneous operations, and can protect equipment to the maximum extent while completing bag replacement, reducing operation and maintenance costs.
Hot Tags:


Contact Us
Tel:
WeChat:
WhatsApp:
E-mail:
Address:
338 National Road South, Longfengdian Village, Botou City, Hebei Province, China
JiuznTomine is expertly delivering technically complicated projects in markets & provides custom solutions for their customized need.


CONTACT INFO
Tel: +86 18531710311
WeChat: +86-18531710311
338 National Road South, Longfengdian Village, Botou City, Hebei Province, China