











Practical operation of replacing and installing the dust bag of the bag filter
Jan 30,2026

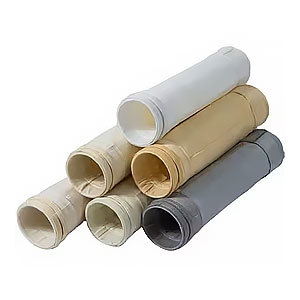
As the core filtering component of bag filters, the installation quality and replacement standardization of dust removal bags directly affect the dust removal efficiency, operational stability, and service life of the filter bags. This article combines practical experience in industrial sites to provide a detailed disassembly of the replacement process, installation points, and precautions for dust removal bags. It is applicable to the daily operation and maintenance of bag dust collectors under various industrial conditions, without any product promotion throughout the process, and only provides practical guidance.
1、 Preparation for Replacement and Installation
(1) Preparation of Tools and Materials
1. Basic tools: screwdriver, wrench (hexagon socket, adjustable wrench), pliers, tape measure, brush, compressed air spray gun (low pressure), ensure that the tools are intact, without damage or looseness.
2. Material preparation: New dust removal bags that meet the equipment specifications (matching the dust collector model, filter medium, and operating temperature), sealing gaskets (to be replaced if aging occurs), and lubricating grease (in small quantities, used for cage installation).
3. Safety protection: Safety helmet, dust mask, protective gloves, anti slip shoes. If the working environment is high temperature or altitude, additional protective equipment such as insulated gloves and seat belts should be equipped.
(2) Equipment shutdown and safety confirmation
1. Shutdown operation: According to the operating procedures of the bag filter, turn off the fan, pulse blowing system, and feeding device in sequence to ensure that the equipment completely stops running, cut off the main power supply of the equipment, and hang a warning sign "Equipment maintenance, no closing" to prevent accidental start-up.
2. Safety check: Wait for the internal temperature of the dust collector to drop to room temperature (to avoid high-temperature burns), check if the inlet and outlet flue valves of the dust collector are tightly closed to prevent external dust and smoke from flowing back; Open the maintenance door and ventilate for 5-10 minutes to reduce the internal dust concentration and ensure a safe working environment.
3. Internal cleaning: Use a brush and low-pressure spray gun to gently clean the accumulated dust on the surface of the dust collector flower plate and cage bone, to avoid the dust falling onto the surface of the new filter bag and affecting the filtration effect; If there is too much ash accumulation, the ash hopper unloading device can be turned on first, and the accumulated ash can be cleared before cleaning.
2、 Steps for dismantling old dust removal bags
1. Remove the spray pipe: If the spray pipe covers the installation port of the filter bag, use a wrench to unscrew the fixing bolt of the spray pipe, gently remove the spray pipe, and place it in the designated area to avoid collision or damage to the spray nozzle.
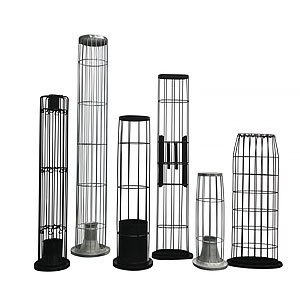
2. Remove the cage bone: Hold the top of the cage bone with both hands and gently lift it upwards to ensure that the cage bone is completely separated from the filter bag and flower board. If the cage bone is adhered to the filter bag, do not forcefully pull it. Use a low-pressure spray gun to gently blow the connection and slowly separate to prevent the filter bag from being damaged and dust from scattering.
3. Dismantle the old filter bag: Hold the top opening of the old filter bag and gently press down to separate it from the mounting hole of the flower board. Then slowly remove the old filter bag, fold it neatly, and place it in a sealed garbage bag to avoid dust leakage. Dispose of it according to industrial waste standards in the future.
4. Check and clean the installation position: After removing the old filter bag, carefully clean the dust and debris in the flower plate installation hole and filter bag slot with a brush. Check whether the sealing surface of the installation hole is flat and undamaged. If there are scratches or deformations, they need to be repaired in a timely manner to ensure a tight seal.
3、 Installation process of new dust removal bag
1. Inspection of new filter bags: Before installation, inspect the appearance of the new dust removal bags one by one to confirm that there are no defects such as damage, loose lines, or coating peeling. Check that the specifications (diameter, length) of the filter bags are consistent with the equipment requirements to avoid installation failure caused by non-compliance with specifications.
2. Filter bag pretreatment: If the filter bag is made of special materials such as film coating, anti-static, high temperature resistance, etc., and the working conditions require high standards, the surface of the filter bag can be gently blown with clean compressed air before installation to remove dust generated during transportation; If the filter bag needs to be soaked and pre treated, it should be pre treated according to the material requirements, dried before installation.
3. Cage bone installation: Slowly insert the cage bone into the interior of the new filter bag, ensuring that the cage bone is completely stretched, without bending or deformation, and the bottom of the cage bone is tightly attached to the bottom of the filter bag to avoid scratching the inner wall of the filter bag at the top of the cage bone; If the installation of the cage bone is difficult, a small amount of lubricating grease can be applied to the surface of the cage bone to assist in installation.
4. Installation of filter bag and flower board: Hold the top of the filter bag with both hands, align the installation port on the top of the filter bag with the installation hole on the flower board, gently push it upwards, so that the installation port of the filter bag is tightly adhered to the sealing surface of the flower board, ensuring no gap or offset; If the filter bag is equipped with a pressure ring, place the pressure ring on the outside of the filter bag installation port, tighten the pressure ring bolt with a screwdriver, fix the filter bag, and tighten the bolt evenly to avoid damaging the filter bag or sealing surface with excessive force.
5. Reset the spray pipe: Align the spray pipe with the installation position, adjust the distance between the spray nozzle and the top of the filter bag (usually 5-10mm), ensure that the spray nozzle is aligned with the center of the filter bag, then use a wrench to tighten the fixing bolts of the spray pipe, and check whether the spray pipe is stable, without looseness or offset.
6. Batch installation: Follow the above steps to complete the installation of all filter bags in sequence. During the installation process, avoid collisions and friction between the filter bags and cage bones, flower plates, spray pipes, and other components to prevent damage to the filter bags; After installation, check one by one whether the filter bag is firmly installed, whether the seal is tight, whether the cage bone is stretched, and whether there is any tilt or looseness.
4、 Inspection and trial operation after installation
(1) Installation quality inspection
1. Appearance inspection: Check whether all filter bags are installed neatly, without tilting or falling off, whether the surface of the filter bags is damaged or scratched, whether the cage bone is bent or deformed, and whether the spray pipe, pressure ring and other components are firmly fixed.
2. Sealing inspection: Focus on inspecting the connection between the filter bag and the flower board, as well as the sealing surface of the spray pipe, to ensure no gaps or air leaks. Gently press the top of the filter bag to feel the tightness of the seal.
3. Cleaning of debris: Check the inside of the dust collector to ensure that there are no tools or debris left, and avoid damaging the filter bag, cage or fan during equipment operation.
(2) Trial operation
1. No load test run: Close the dust collector maintenance door, connect the equipment power, turn on the fan and pulse blowing system, run without load for 3-5 minutes, observe the equipment operation status, listen for any abnormal noise, check whether the blowing system is blowing normally, and whether the filter bag is shaking or falling off.
2. Load test run: After the no-load test run is normal, turn on the feeding device and conduct a load test run. Run for 10-15 minutes, observe the pressure difference between the inlet and outlet of the dust collector, check the filtering effect of the filter bag. If the pressure difference between the inlet and outlet is abnormal or there is dust leakage, immediately stop the machine for inspection and troubleshoot installation problems.
3. Trial operation adjustment: According to the load trial operation situation, adjust the pulse blowing cycle and blowing pressure to ensure good dust cleaning effect of the filter bag, stable equipment operation, and no abnormal conditions before it can be put into normal operation.
5、 Practical precautions
1. Safety first: Strictly follow the equipment maintenance safety regulations throughout the process, and it is strictly prohibited to operate the equipment without stopping or cutting off the power; Wear safety protective equipment during homework to avoid safety accidents such as dust inhalation, falling from heights, and high-temperature burns.
2. Filter bag protection: The filter bag is a vulnerable component, so it should be handled gently during operation to avoid dragging, pulling, and squeezing, and to prevent damage to the filter bag and coating detachment; Avoid contact between the filter bag and sharp objects to prevent scratches.
3. Specification matching: The specifications and materials of the new filter bag must be completely matched with the model and working conditions of the dust collector. If the specifications of the filter bag do not match, it will cause installation difficulties, poor sealing, and affect dust removal efficiency; If the material does not match, it will shorten the service life of the filter bag and even damage the equipment.
4. Tight sealing: The sealing between the filter bag and the flower plate is the key to ensuring dust removal efficiency. During installation, it is necessary to ensure that the sealing surface is flat and without gaps, and that the tightening force of the pressure ring bolts is uniform to avoid air leakage and dust bypass, which affects the filtration effect.
5. Daily maintenance: After replacing and installing the filter bag, it is necessary to conduct daily inspections, regularly check the status of the filter bag, clean up accumulated dust in a timely manner, adjust the spraying parameters, avoid bag sticking, damage, aging, and extend the service life of the filter bag.
6、 Common installation problems and troubleshooting methods
1. Problem 1: The filter bag becomes loose or falls off after installation. Troubleshooting: Check if the pressure ring bolt is tightened, if the filter bag installation port matches the flower plate installation hole, if the cage bone is bent or deformed. Tighten the bolts accordingly, replace the matching filter bag, or calibrate the cage bone.
2. Problem 2: Air and dust leakage during equipment operation. Investigation: Check whether the connection between the filter bag and the flower board is tightly sealed, whether the filter bag is damaged, and whether the sealing surface of the spray pipe is intact. Repair the sealing surface and replace the damaged filter bag in a timely manner.
3. Problem 3: Abnormal high pressure difference between inlet and outlet. Troubleshooting: Check if the filter bag is installed too tightly and if the cage bone is not stretched, which leads to poor ventilation of the filter bag; Or if there is dust accumulation on the surface of the filter bag that has not been cleaned, adjust the tightness of the filter bag installation and clean the dust accumulation accordingly.
4. Problem 4: There is abnormal noise during equipment operation. Troubleshooting: Check if the cage bone is skewed, rubbing against the filter bag, or if the spray pipe is loose or collides with the filter bag. Correct the cage bone, tighten the spray pipe bolt, and adjust the distance between the spray nozzle and the filter bag.
Summary: The replacement and installation of dust removal bags may seem simple, but in reality, attention needs to be paid to every detail, from early preparation and removal of old bags to installation and trial operation of new bags. Each step requires standardized operation to ensure that the bag filter can achieve the best filtering effect and extend the service life of the filter bag and equipment. During the practical operation, it is necessary to flexibly adjust the operating methods based on the actual situation and working conditions of the equipment, promptly investigate installation problems, and ensure stable and efficient operation of the equipment.
Hot Tags:
PREVIOUS:


Contact Us
Tel:
WeChat:
WhatsApp:
E-mail:
Address:
338 National Road South, Longfengdian Village, Botou City, Hebei Province, China
JiuznTomine is expertly delivering technically complicated projects in markets & provides custom solutions for their customized need.


CONTACT INFO
Tel: +86 18531710311
WeChat: +86-18531710311
338 National Road South, Longfengdian Village, Botou City, Hebei Province, China